Showing posts with label jQuery. Show all posts

Tuesday, June 24, 2014

Integrating Datepick.js into your XPage

No, Datepick.js is not another Javascript framework; it is simply a super awesome jQuery plug-in that I recently discovered, and put to use in my latest XPages project. 

There are many calendar plugins to use with jQuery.  Here is an article where someone decides which are the top ten. I entertained using some of these, specifically #1 and #6 in the list, until I discovered "jQuery Datepicker" by Keith Wood, which for some reason was not on this list. Once I discovered this one, I knew straight away that my search was over.  In this post, I will show you how I used jQuery Datepicker (datepick.js) within an XPage. 

Generally, this calendar is used like most datepickers, where it is shown via a button and then hidden again. However, i
n my use case, I wanted a full month calendar that was always visible in the left side navigation as shown below.  Below is the 'finished' result.

This is the finished result. The random number is there so I know it refreshes, but later will be meaningful content.


How I made it work

The first step is to download the source and copy it to your WebContent folder in your application. I recommend creating a "js" subdirectory and placing the files in there.  You then need to reference the files in your XPage using the <script> tag.

Step 1:  Download and add to page

The second step is to create a place to put the calendar and give it a class. I created a panel and gave it a class of ".calHere". 
Step 2 - Add a class where to put the calendar
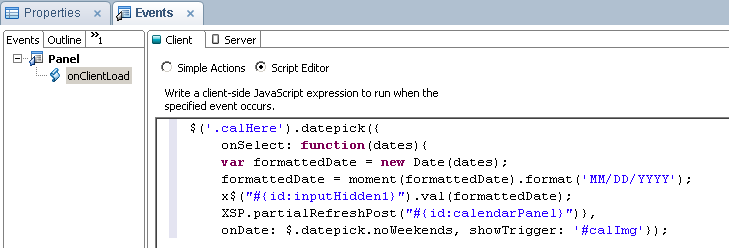
The third step is to create code to launch and process the calendar.  In the onClientLoad event of the panel, I have the following code. 
Step 3 - Format the calendar and figure out what to do with result

Code Explanation 

First it launches the calendar, and then assigns a function to the calendar's onSelect event.  Finally, it also prevents the user from selecting weekends, which is something in my specific requirements.   

Here is how I went about updating the backend data with the value selected in the calendar:
  1.  I first format the Javascript Date using moment.js, as very useful utility for all things time.
  2.   Then update a hidden input control in the content panel with the formatted date.  I make use here of Marky Roden's X$ function for selecting Domino ID's in jQuery.
  3.   Lastly, I force a partial refresh of the content panel using the built-in XSP object.
I am very pleased with how this came out.  I highly recommend that everyone at least become aware of Keith Wood's jQuery Datepicker.  The datepicker has every imaginable way that it can be customized both in functionality and style.  I wish I discovered this a long time ago.   

Friday, June 28, 2013

Issue with Referencing an Xpages generated #Id using Bootstrap

UPDATED

I am not sure if this is a Bootstrap issue or an HTML5 issue, but there is an issue when referencing the long generated ID files in Xpages.   ID's like 'view:_id1:_id2:_id41:_id43:include1:shipper'

Today I was working on a form where the user can press a checkbox, and it will reveal additional entry fields.   I am using the features of Bootstrap to accomplish this.  It looks great and works like this:

When first loaded
With the checkbox checked
Using bootstrap, this is amazingly easy to accomplish.   The part that you want to initially hide is wrapped in a <div>  with a class="collapse in".  The collapse tells Bootstrap that this is the div you want to expand and collapse, and the "in" means that you want to start collapsed.

In the checkbox, you simply set two attributes:  data-toggle="collapse" and data-target="#the id of the div">.   That is all you have to do to make it work, really.

All went well until I changed from using a <div> to an <xp:div>.  I wanted more control over the attributes, specifically it was defaulting to "in" but I wanted to compute whether to start "out" or "in" based on whether the checkbox is already checked for existing documents.

When I started using the XSP div, I could not get it to open and close based on the checkbox.  It took me a long time of playing with the attributes using Inspect Element in Chrome to determine that Bootstrap does not like colons in ID's.

The fix is to escape your colons with a double backslash (\\) in SSJS.  When it gets to HTML, the value will be a single backslash which will escape the colon and in your id when referencing it.

This is NOT a good way of fixing this.  For a better way, see below.

I found out after I posted this that if the ID were to ever change then your code will break.   A big thanks to David Leedy who let me know that my code has potential issues.  He also pointed out to me that Marky Roden has made an excellent xsnipet for handling the unreadable colons.  

The Better Fix
  1. Copy Mark Roden's xsnipet into my clientside javascript library.
  2. Removed the attribute 'data-target' from your <xp:div>.
  3. In my $(document).ready() function, I added the following line of jQuery  $('input.checkbox').attr('data-target', x$("#{id:shipper}").selector);
UPDATE #2: I found out that if you do a partial refresh on the page, you will lose the fix if you leave it in the document.ready() as shown above.   The fix is to move the jQuery the clientside event of you partial update.

The jQuery was easy to write.  It simply adds an attribute to the checkbox calling the x$ function which selects the <xp:div> with a name of 'shipper'.   The '.selector' property returns the ID name.  This works just the same as before but is a much better way of coding this.  (Note: that I will only have one checkbox on this page, otherwise I would have to be more specific with my jQuery selector.)


I hope this saves someone some frustration when using ID's in Bootstrap.

Thursday, May 23, 2013

Using Bootstrap Modal Dialog Control to Create a Step by Step Wizard

For my latest project, I finally got the framework complete so I can begin creating content.    As opposed to the demo in the last post, I decided to have a step-by-step wizard for data entry.   The last post showed how you could have multiple buttons on the same page.  I will probably need that technique for editing existing documents later.

I also discovered today that the extension library dialog control <xe:dialog> can be modified to act as a bootstrap modal dialog.   See this link on the new site http://bootstrap4xpages.com  by Mark Leusink for more details.   I really wish I saw this post earlier, but since I already built what I did, I am going to stay with it.

The way this works is that the calling xpage (New_PO) has a button which the user presses to begin the first step in the process.   The button starts by launching an xpage that holds the modalWindow custom control.   The control is automatically launched so that it appears to the user that it opens automatically.  In actuality, I have an unnamed button that is launched using jQuery upon page load. This works really well.   Here is the very simple code:

 $(document).ready(function(){
$('a.btn').trigger('click');
});

Note that there is one of these 'shell' xpages for each step in the wizard.  They are needed because you can't link to a custom control, that really doesn't make sense.   There is one shell xpage per step and they are all the exact same code with the exception of the custom properties.

Since the last few posts, I have needed to make several modifications to fit my current project.  These are the changes I made to the modalWindow custom control.

  1. Removed slide effect from the modal window.   The effect, although cool, was a bit of an eye strain, and more importantly caused vertical centering issues on a mobile user agent.    I changed it the button class from class="modal fade hide" to class="modal hide".
  2. Prevented the user from closing the dialog by using the escape key.  This is done by adding data-keyboard="false" to the button or anchor that launches the modal window.
  3. Likewise, I needed to prevent the window from closing when they click off the window.  This is done by adding data-backdrop="static" to the button or anchor.   
  4. Added new custom control property definitions for the nextXPage, and the cancelXPage.   The nextXPage controls which xpage is opened next, and the cancelXPage property takes it back to the beginning xpage.  Without it, the user would be taken to the xpage containing the launch button that they are not intended to ever see.   I will need to add a SSJS function to these as well going forward to process the contents of each window. UPDATE:  I figured out how to add SSJS functions to process the contents of each window, see this post.
I think this solution will be fairly portable, and it is not as complicated as it seems.   Here is a drawing to illustrate.   The blue area is where I begin to develop application specific input fields.  The blue area is where the application specific code will go, the rest will work for any app using this technique (with the exception of the six custom properties).