Sunday, October 19, 2014

Quick Tip: Forcing a CSS override

If you are using OneUI in your XPages application, then you know sometimes it just doesn’t do what you want it to do. Trying to get it to behave can be frustrating, this tip will help when OneUI overides your custom style for reasons unknown.

The Problem

In my case, I was trying to make the labels of a radio button group appear disabled. Only the buttons themselves would look disabled, but the labels looked the same as when the control was enabled.
I don't feel that there is enough distinction between Enabled on the left, and Disabled on the right.
The radio button group control does attempt to make it easy by having a property to enter the styleClass for when the control is disabled or enabled.

XPages makes it easy for you to specify a disabled styleClass
This works fine for most of the CSS, except for some reason the color is overwritten as shown in the left picture below. I spent a lot of time playing with multiple CSS selectors with no success until I discovered how to force the CSS to override.
For some reason the "color" is overwritten by OneUI

The Solution

The way to override is to add “!important” after the attribute you don’t want to be overwritten. In my case, the only attribute that wasn’t behaving was the color. After I added !important, it worked exactly like I wanted. In the right picture above shows what this one change gives you.

Here is the Before code:

.radio-disabled {
font-size:14pt;
font-family:Calibri;
color: #AFAEB5;
}

Here is the After code:
.radio-disabled {
font-size:14pt;
font-family:Calibri;
color: #AFAEB5 !important;
}

The Finished Result
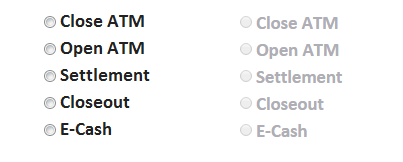
Enabled on the left, disabled on the right. It is easy to distinguish which is which.

Final Thoughts

Perhaps this is old news to some who read this. Though, in my office, none of the four XPages developers knew about this before. I hope that this helps other XPagers who wrestle with OneUI.

I will add that, this should be something that is used sparingly. In my case, only the specific class of “.radio-disabled” is using it. I can see that you could really mess your UI by overusing !important. Here is a related article called “Don’t Use !important” that explains some of the pitfalls.

Thursday, October 9, 2014

My First Experience Using the JSON-RPC Service.

This is one of those posts, where I am writing to my future self so that I can remember all that I learned about using the JSON-RPC service.

If you are an XPages developer who is interested in learning about this tool then I first suggest checking out the following resources:
  • This email response to a question by Tim Tripcony is sheer brilliance. I had to read and re-read this several times to really understand it, but that speaks all about me and nothing about how Tim explains things.  A big thanks to David Leedy for making it available to all.
  • Keith Strickland has written a very helpful blog post on JSON-RPC way back in June 2011. It was Keith who first turned me on to the Remote Service control when I found his answer to this Stack Overflow question.


How I and why I used the JSON-RPC control

I needed to run a server based Java method that called a process and returned a result. My requirements stated that I need to try this process twice in a single event, and tell the user if the first try has failed. The way that Java works is to always one return value, so the intermediary messages would never be returned. In order to accomplish what I needed, I knew that clientside javascript was my best bet. In order to call a serverside java method from clientside JS, I decided to use an JSON-PRC call.


How to create the JSON-RPC service

1) Pull the tool from the pallet under “Data Access”. It is just called “Remote Service”.


2) Give the service a serviceName and/or a pathInfo. I believe that the service may be referred to as either.


3) Create the methods that you need to run. This will involve adding optional arguments and adding SSJS code to run in the script property. The script property doesn’t use the standard script editor that is usually used when you can enter serverside javascript.


4) The finished result

Using the Remote Service

It took me a while to understand that the service doesn’t return a value initially, it returns an object that contains a callback method. The callback method actually returns the value. Thanks to Toby Samples who answered my Stack Overflow question helping me with this.

Here is the code where I call my remote service methods:

Code Explanation:
  1. First the code shows the user a message that the process is starting
  2. Next, a value needed in one of the messages is pulled from a hidden input
  3. The RPC method is called, the object returned is assigned to the var “deferred”
  4. The callback of the object is called to get the result of the ‘first’ method
  5. If the ‘first’ method returns true, the user gets a success message
  6. If the ‘first’ method fails, the user gets a ‘retrying’ message, and the second method is called and the resulting object is assigned to a var “insideDeferred”
  7. If the result of the ‘second’ is true, the user gets a success message
  8. If the result of the ‘second’ method is false, the user gets a ‘try later’ message.

A slight problem

This code all worked great, except… it ran so fast that the ‘trying again’ message appeared too quick for a user to read. I spent a lot of time trying to figure out a way to use timers to slow it down. Eventually I decided that I was spending too much time on this, and used an simple alert for that message, which fulfills my requirement and allowed me to get moving with the rest of the project.


Parting Thoughts

Now that I understand how the Remote Service is used, I am sure I will find more uses for it.  It is an important tool in any XPages developers toolbox.  I can also see it being an important part of web applications that use a Domino backend and frontend Javascript frameworks like Angular JS.