Of the features that Marky very briefly touched on during his Connect session was the ability to add a RowExpander to display more information about the row above. This feature is great when you have more information to display than the available screen real estate will allow. In this post, I will show how I used a Row Expander in an EXTJS grid within an XPage.
The Problem
In my Purchase Order application, I needed to display Line Item information in a grid. At a minimum the line items had 11 columns, and some types had 15 columns. In addition, I also needed to display the quantity that each store ordered, as well as something called "Shippers" which are tied to individual line items. Shippers are a box that contains a variety of different product UPC's in case you are wondering. I did not want force the user to have to click on each line item and open another page just to see this information.The Solution
I used the Row Expander plug in to display my store quantity and shipper information. The Row Expander simply adds a column with a +/- that allows you to display additional information. The table in brown, shows store quantity, and the table in blue shows Shippers. (All of this will be immediately apparent to users of this system) |
| The Finished Result (The second line item contains Shippers, the first does not) |
How I did it
To use the Row Expander, you can only provide it straight HTML, no facets here. You have to build the HTML yourself, and then make sure it is dynamic. It is sort of like the way that you did things using traditional Domino web development. I designed both tables differently due to the fact that 'Shippers" are separate documents, and the Store Quantities are part of the line items.
Building Store Quantity Table
Think of the Store Quantity as information that I couldn't have fit in the columns due to space. This is the table with the Brown headers above. In this case I built that table using JSFiddle until it looked how I wanted it. The actual numbers are pulled from a view using the REST service, just as you would for any column. Note: I used a Rest Service of type "ViewJsonService" that uses a categoryFilter to only pull data relating to the current document.
 |
| Columns used in the table are read from the REST Service |
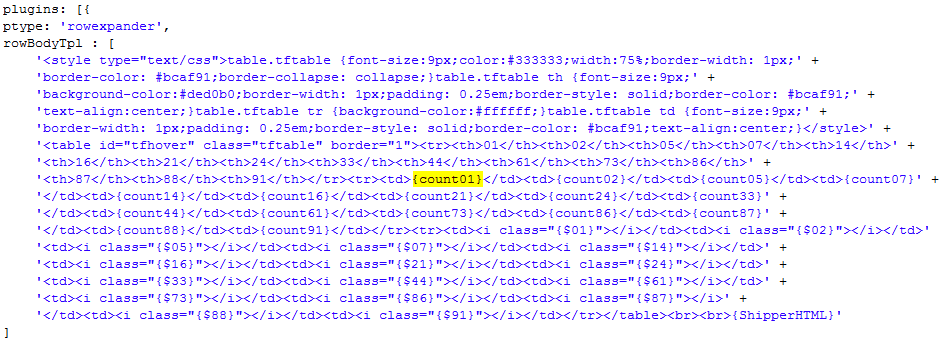
Once the data is pulled from the view into the Rest Service, you can read into the table you created by placing the name is curly braces. Don't judge me on the use of the <style> tag for this usage. The data is always fresh because it pulls from the view at runtime.
 |
| All of this code builds the first table, with the exception of the last fourth of the final row. |
Building the Shipper Table
Think of the Shipper table as any other data you want to put in the row expander. In my case, the Shipper is a separate document, so the contents of each are not included on the Line Item documents. I guess I could have built some multi-value fields and place the shipper details in those fields, but that sounded really painful. What I decided was that after the creation/editing of the Shippers, I would dynamically build the table and save it to the related Line Item.
Upon completion of a new or edited Line Item, I run a java method I wrote that is shown below to created the table and write it to the parent document. I then display the table HTML in the view that the Rest Service pulls from. I then pull the column in the Rest Service, and display it in the Row Expander. In the above screenshot, the column is "ShipperHTML".
There is nothing really hard about the java code to created the table. I will point out that I used StringBuffer to build the table, which is more efficient than using a String. The rest of the code should be straightforward, even if you don't know java well. This method lives in a managed bean that I use to track the progress of the each Line Item as it is being created or edited. I call the createShipperTable() method from the method that saves the Line Item to the backend document.
 |
| Java method to build Dynamic Table |
Conclusion
The Row Expander is just one of the many useful features of EXTJS. I hope this post is helpful if you ever need to use it. I also hope my need to use application specific references didn't take away from the understand of how it works.
Very cool mate :)
ReplyDelete